Exercise is important for keeping the body healthy and helping you feel younger. As one ages, it becomes increasingly important to stay active. Neglecting to do so can cause you to feel older and more tired, and it may even cause you to experience aches and pains.
But sometimes high-intensity exercise can be a bit too much for someone to do. That’s why you should know the right moves and exercises to perform for the benefits you seek! Here are some moves that relieve pain and make you feel younger.
Here Are 10 Moves That Relieve Pain And Make You Feel Younger
1. Reverse Table Pose
This move is fantastic for stretching out the chest and shoulders. After sitting all day, it’s a great way to rest the body and help it find balance. Those who cycle or swim can also enjoy soreness relief as they go, since the move provides amazing energizing benefits. Here’s how to do it!
- Step 1: Sit down on the floor. Keep your legs stretched out in front of you and make sure your back is straight.
- Step 2: Bend your knees so your feet are placed flat on the floor. Move your hands so they are just behind your hips and just a little to your side, with palms also flat against the ground. Have your fingertips angled so they are pointing forward.
- Step 3: Press upwards from your feet and hands, with your knees bent, and lift your chest and buttocks upwards. Inhale as you do this. Your backside should be kept relaxed while your focus is on your legs.
- Step 4: Lean your head backwards gently, dropping it. Breathe in and out as you hold this pose. Hold for between five to ten seconds.
Please note that if you have shoulder, wrist, or neck injuries, you should not attempt this move!
2. Legs Up
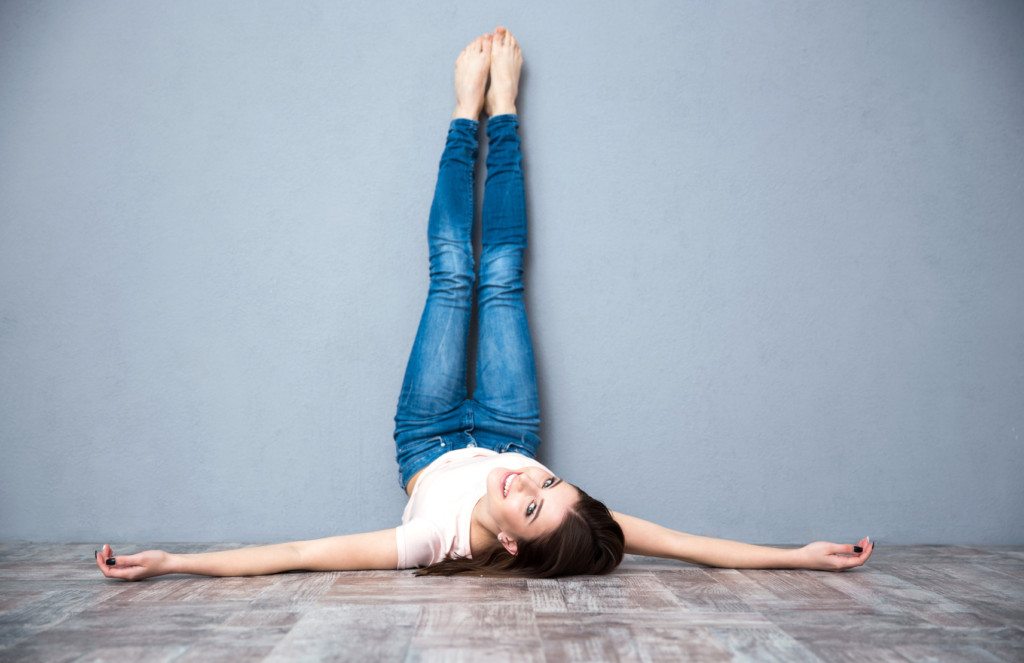
Resting with your legs up at a 90-degree angle is a fantastic way to bring some circulation back to the legs and feet, especially if they are tired or cramped after a long day. You can do this move in two ways. Here’s how to do it as a higher intensity exercise.
- Step 1: Lie flat on your back. Have your arms extended and your palms against the ground.
- Step 2: Lift your head slowly so that your chin gently touches your chest.
- Step 3: Lift your legs in such a way that your back stays planted on the floor. Swing your legs slowly upwards until they are 90 degrees from your body.
- Step 4: Gently bring your legs back down and repeat. You can also opt to hold the position for a few seconds.
Here’s how to do it the more gentle and relaxed way:
- Step 1: Get a couple of pillows or a rolled up blanket or towel. Place your cushions of choice near a wall.
- Step 2: Lie down with your back to the floor and place your hips on top of the cushions. Your pelvis should be positioned just a bit higher than your chest.
- Step 3: Raise your legs so they rest upwards against the wall at a 90-degree angle from your body. Keep your arms out and angled at your sides with your palms facing up.
- Step 4: Adjust yourself so your distance from the wall is comfortable.
- Step 5: Relax. Close your eyes and inhale and exhale slowly and deeply. Do this for between one and five minutes.
Do note that if you have a neck injury, high blood pressure, or glaucoma, this move may not be best for you. You may also want to skip it if you are menstruating at the time.
3. Child-Cat-Cow Progression
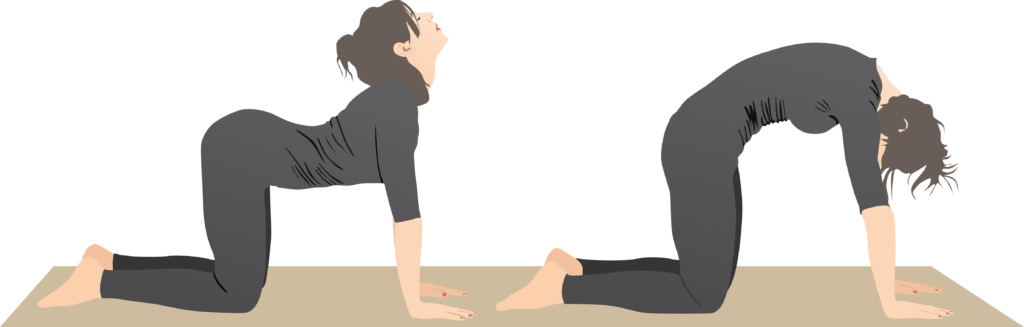
This progression is a great set of moves for reducing pain from inflammation. At its core, these poses are highly restorative. They focus on relaxing and healing the body, reducing stress along the neck and shoulders.
In addition, these moves are great for making you feel younger because they reduce lower back pain while strengthening those back muscles to prevent the usual weakening that comes with age.
Here’s how to do this move progression:
- Let’s start with the Child’s pose. Get onto your hands and knees, shifting yourself so you are sitting with your weight on your hips.
- Keep your feet together, with your large toes touching, but have your knees open.
- Fold your body towards the front until your head rests against the floor. Have your arms stretched ahead of you. You can also opt to place them next to your sides if you prefer.
- Hold the pose, breathing deeply.
- Now, let’s move on to the Cat-Cow progression. Come out of the Child’s pose and push yourself up so you are on all fours. Your hands should be resting on the mat approximately a shoulder-length apart, and your knees should be doing the same. Make sure your shoulders are aligned above your wrists.
- Inhale and focus on your abs as you slowly round your back upwards so your back is arched. As you do so, your chin should move downwards and touch your chest. Hold the pose.
- Exhale and relax so your stomach moves back down and further towards the floor. You should now be arched in the other direction. Raise your chin up as you do so.
- Repeat, arching your back and up and down, for up to 10 times, then return to the Child’s pose. You can repeat the whole exercise as much as you like – 10 reps is recommended.
4. Seated Twist
This move helps your body become more flexible but in a gentle way. It promotes spinal health and helps release back and hip tension, making it great after a day of sitting down. Here’s how to do it.
- Step 1: Sit so your legs are crossed. Have your back straight, and your arms out so each of your fingertips touches the floor at your sides.
- Step 2: Inhale and lengthen your back as you do. If you are comfortable with it, you can also lift your arms upwards.
- Step 3: Exhale and twist your body in a fluid, gentle motion to the right. Your movement should begin from the bottom of your back and naturally move upwards.
- Step 4: When you do this, your left hand should move until it is placed on your right knee. Meanwhile, your left hand should move so it is resting against the floor behind you. Your head should follow this motion naturally, looking over your shoulder.
- Step 5: Hold for a few seconds, up to 30. Then inhale and move back to the center, then exhale and repeat, this time twisting to your left.
If you experience discomfort while doing this move, fold up a blanket or use a bolster or pillow beneath your hips.
5. Downward Dog
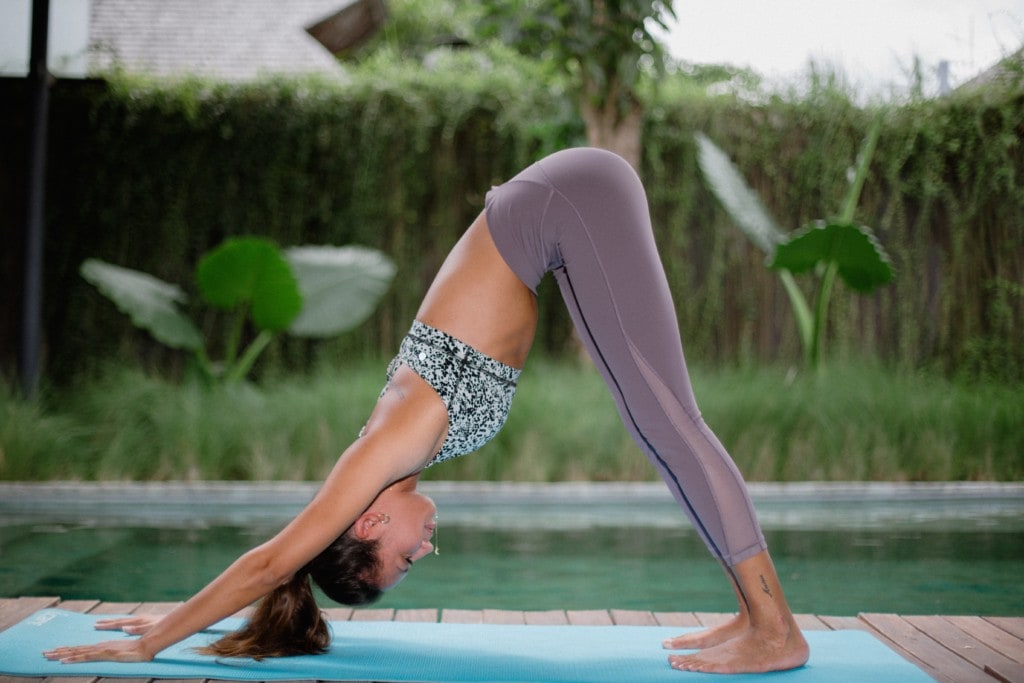
The downward dog is probably the most famous yoga move there is. It’s a staple move and provides plenty of positive benefits, ranging from strengthening qualities to stretching ones. It can relieve stress, help positive thinking, and bring headache relief. It is also known to be good for back pain and may boost digestion, too! Here’s how to do it.
- Step 1: Start on all fours. Your hips and knees should be aligned, as well as your wrists to your shoulders. Have your fingers spread and fanned out, centered to face forward, and your feet should be straight and at hip-width.
- Step 2: Inhale. Tuck in your toes and push your hips upwards so your body resembles an upside-down “V” shape. Your heels may be off the floor and your knees may be slightly bent – this is fine. If you are able to, gently lower your heels and straighten your knees, but do not push it.
- Step 3: Relax your neck muscles and keep your shoulders unstrained. If you’re having trouble with the stretch on your legs, you can widen your stance. Balance your body’s weight between your feet and your hands.
- Step 4: Hold the pose and transition into another move. We recommend the plank!
6. Plank
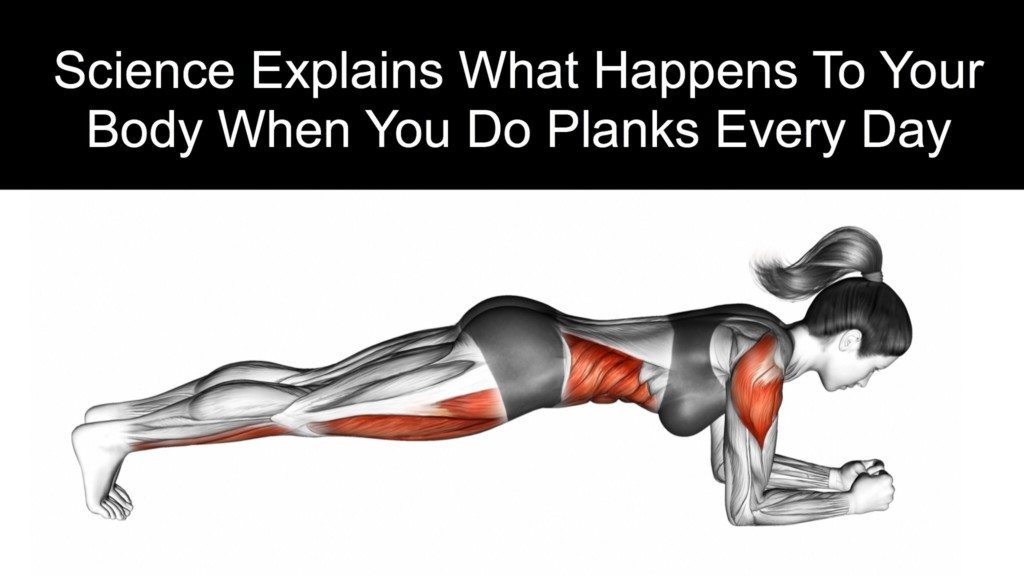
This pose is fantastic for core strength and it helps the upper body as well. These are areas that commonly deteriorate as we age, so doing this move has many positive sides in addition to helping you feel younger. Here’s how.
- Step 1: Start on all fours. Your shoulders should be above your wrists.
- Step 2: Walk your knees backwards until they are a straight line away from your shoulders. As you do so, keep your core abs engaged, shrinking your belly button inwards so your hips stay upright.
- Step 3: Now, hoist yourself up onto your toes so your body is in a straight line and suspended above the ground by your wrists and toes.
If your wrists hurt when you do this move, instead of using your hands, bend your elbows and use them instead.
7. Warrior II
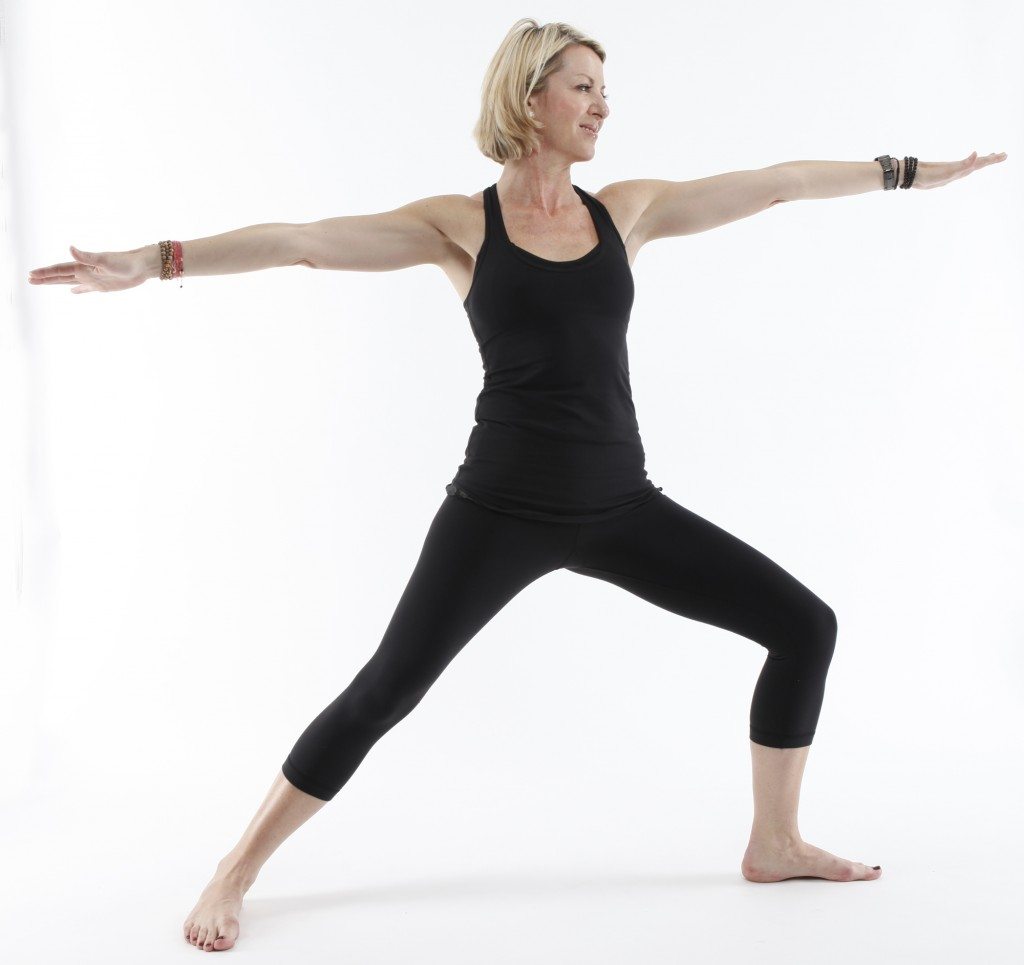
The Warrior II is a simple yoga pose that targets knee pain and strengthens thigh muscles. Given the fact that aging can weaken the knees, this is a great pose to relieve pain and make you feel younger. It can also help your arms and abs gain strength. Here’s how to do it.
- Step 1: Stand with your feet spread between 4 and 5 feet apart. Your right foot should face forward (to the side of where you are facing). Your left foot should be slightly turned in, resting just parallel to the back of your exercise mat.
- Step 2: Exhale, keeping your upper body facing forward. At the same time, bend your right knee down so it rests over your ankle.
- Step 3: Inhale and lift your arms out to the side, turning your head to the right as you do so.
- Step 4: Hold this pose for up to 30 seconds, then repeat on the other side.
8. Squats
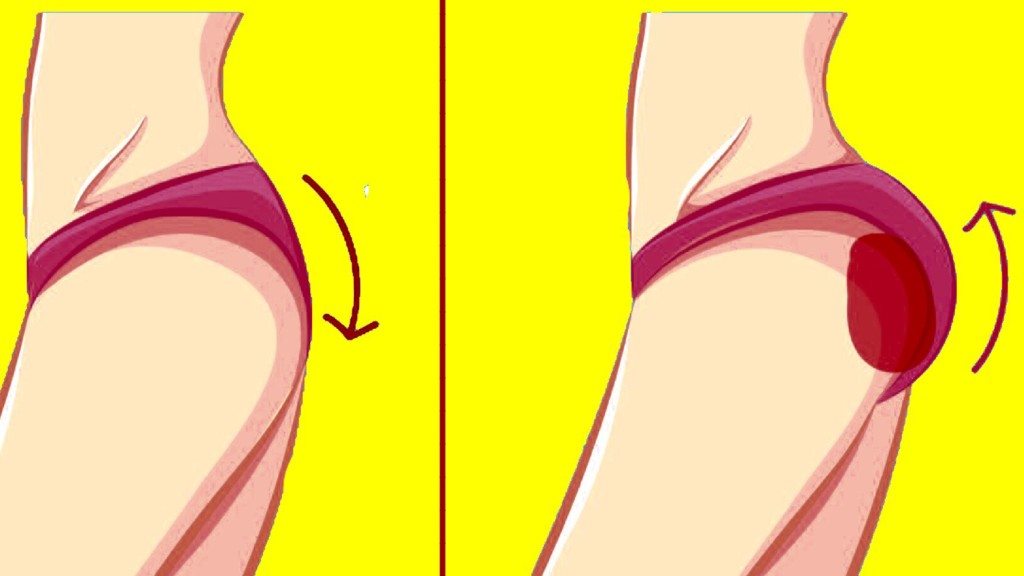
Squats are great exercise moves. They help your lower body muscles, especially your calves, quads, and glutes – all areas that tend to lose strength as they age. Having these muscles fit and strong will help prevent unwanted injury. Here’s how to do this move.
- Step 1: Stand with your feet apart, preferably at hip width. Your toes should face the front.
- Step 2: Lower your backside down as though you were going to sit, dropping as far down as you feel comfortable with. Make sure your back stays straight.
- Step 3: Hold for as many seconds as you feel comfortable, then push yourself back to your starting position. Repeat as much as you like. We recommend 10 reps.
For a more advanced squat, try doing this move with your feet and knees together instead of apart. Make sure your knees stay behind your toes if you do this, so as to avoid any injury or strain.
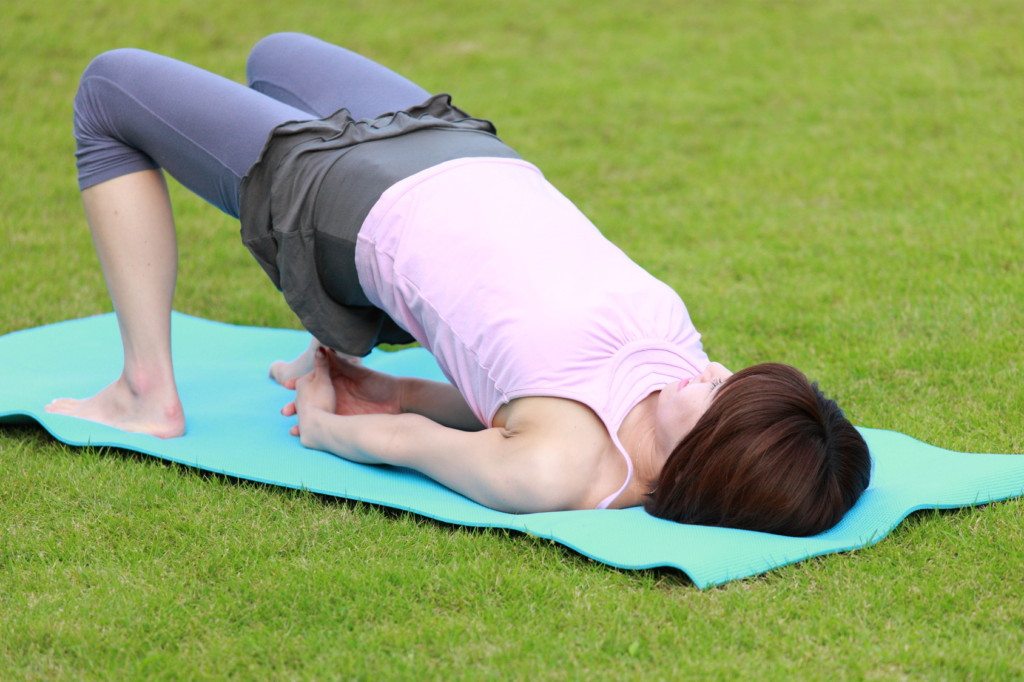
9. Glute Bridges
This move works wonders for the entire lower body and gives so many positive benefits rolled in one. It’s gentle on the knees, great for the thighs and hips, and improves range of motion to help you feel younger when you’re done. Here’s how to do it.
- Step 1: Lie flat on your back. Bend your knees so your feet are pressed flat against the floor at a reasonable distance (about one foot) away from your pelvis.
- Step 2: Tuck in your pelvic area and press down into the heels of your feet as you lift your core and back upwards. Your hips should wind up being open when you reach the peak of this motion.
- Step 3: Keep your back straight and pelvis nice and tucked, and hold the position for around 5 seconds.
- Step 4: Lower yourself back to your starting position and repeat as much as you’d like. We recommend 15 reps.
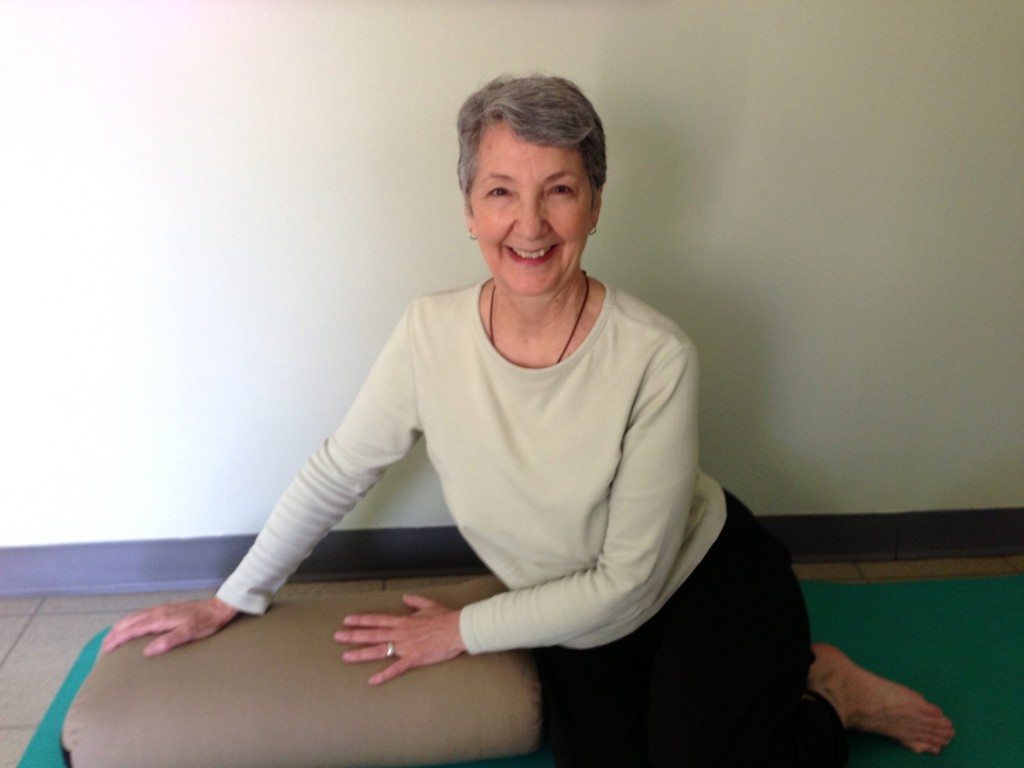
10. Reclining
This move isn’t about exercise as much as it is about rest and relaxation. It’s great for reducing inflammatory pain and helps the body rest and calm down so it can heal. This will, in turn, make you feel younger. Here’s how to do it.
- Step 1: Get folded blankets or towels, or some bolsters or cushions. You will need four cushioning items of your choice.
- Step 2: Sit on your mat. Bring one cushion so it is just an inch behind where your tailbone is. Put another one where your head will rest. The final two should be placed next to your knees.
- Step 3: Lie down so your head rests on the pillow you prepared and your rib cage drapes across another cushion.
- Step 4: Arrange your feet so the soles touch. Your knees should come to the side with each thigh resting on the final two cushions you prepared.
- Step 5: Your arms should rest, palms up, by your sides.
- Step 6: Close your eyes and let your whole body relax. Breathe deeply and stay in the position for up to 5 minutes.
Final Thoughts On Moves That Relieve Pain And Make You Feel Younger
Gentle, simple exercises are great for the body. They’re easy to learn and non-straining. They strengthen muscles and relieve fatigue. They’re great for focus and positive thinking. There’s no end to what good they can bring!
So what are you waiting for? Put these 10 moves that relieve pain and make you feel younger into practice today, and enjoy the long-term benefits!
The post 10 Moves That Relieve Pain And Make You Feel Younger appeared first on Power of Positivity: Positive Thinking & Attitude.
Source – powerofpositivity.com